
Ever wondered how easy it is to configure a video encoder to stream 4K? In this blog post we’ll show you how, using the brand new Makito X4 video encoder from Haivision. By following these 10 simple steps you’ll be up and running and ready to stream in no time.
Once you’ve installed your encoder and connected it to a network and computer as well as your A/V sources following the instructions in your user guide, you’re ready to configure it. Log into Haivision’s new, simplified and easy to use web interface using the default credentials provided with your encoder and let’s get started!
STEP 1: OPEN THE VIDEO ENCODERS LIST VIEW
To open the video encoders list view, click the streaming icon on the toolbar and click Video Encoders on the left-hand sidebar. The video encoders list view displays the status LED, name, input format, resolution, codec and bitrate for each video encoder.
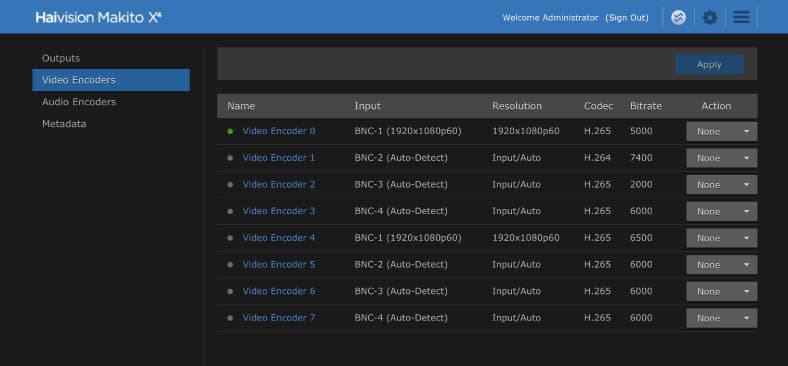 Video Encoders List View
From the video encoders page, you can configure up to eight video encoders to apply to streams. Each encoder can be configured independently and assigned to multiple outputs to support multi-bitrate streaming. You can start and stop, as well as display statistics for each video encoder.
STEP 2: SELECT AN INPUT
To view details or modify the video settings for an encoder, click on the video encoder in the table to open the video encoders detail view. From here you will be able to select the specific video input, resolution, codec and bitrate for each core. Each video encoding core can be configured to 1 of the 4 video inputs (BNC-1, 2, 3 and 4). In this example, for Video Encoder 0, we’ll set the input to BNC-1 which is the only 12G-SDI capable port, all the other ports are 3G-SDI capable.
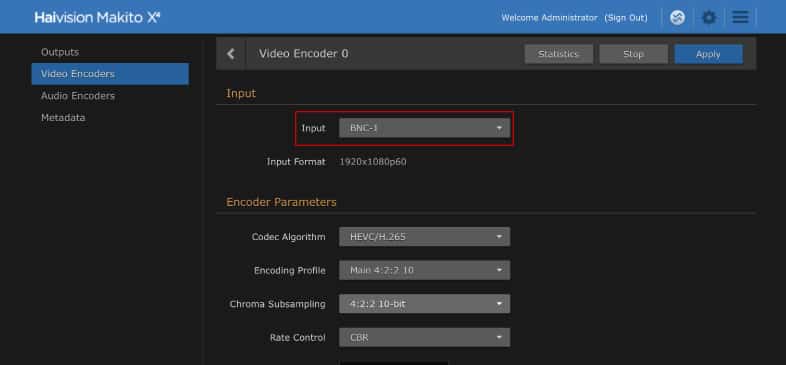 Selecting an input on the video encoders view
STEP 3: CHOOSE YOUR CODEC
Next, it’s time to select your video encoding parameters. Underneath the input option in the video encoders detail view there are a variety of encoder parameters available. These include the codec algorithm, the encoding profile, the type of chroma subsampling and pixel depth, bitrate, frame rate and so on. First, we’ll select the codec algorithm for the encoder, in this case we’re choosing HEVC/H.265.
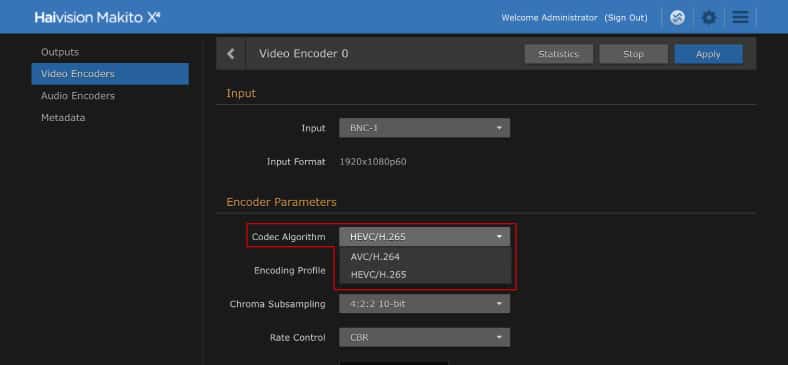 Encoding parameters – codec algorithm
STEP 4: SELECT YOUR ENCODING PROFILE
Depending on which codec you choose and your target application, there are several encoding profiles available, from Baseline, Main and High. In this instance, we’ll choose Main 4:2:2 10-bit.
STEP 5: SPECIFY CHROMA SUBSAMPLING SETTINGS
Next, you have a choice of settings for chroma subsampling and pixel depth. Choose from 4:2:0 8-bit to 4:2:2 10-bit, for workflows where color precision is needed, in order to maintain color fidelity and prevent artifacts in downstream workflows. For 4:2:10-bit, 4:2:2 8-bit and 4:2:2 10 bit, your encoding profile must be Main 10 or Main 4:2:2 10. In this example, we’ve chosen 4:2:2 10.
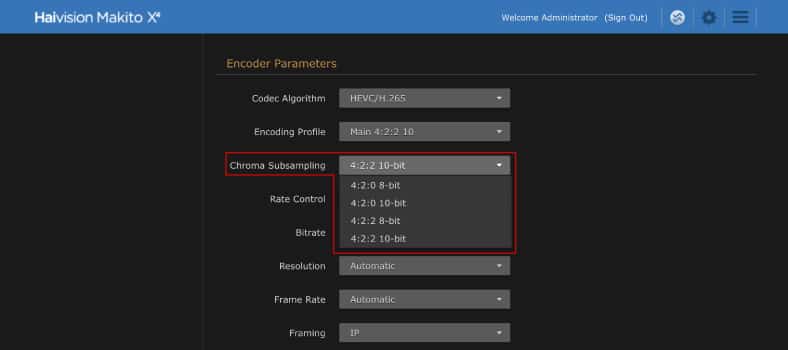 Encoding parameters – chroma subsampling and pixel depth
STEP 6: ENTER YOUR BITRATE
Enter a video bitrate for the encoder anywhere between 32 to 120,000 kbps.
STEP 7: SET YOUR FRAME RATE, FRAMING AND GOP SIZE
At this point you can select the coded picture frame rate per second (from 1 to 60) or choose automatic which encodes at the same frame rate as the input. For framing, select the video compression mode for the encoded video according to the desired delay and quality, choosing from the following 6 options:
- I: I frames only (lowest delay; lowest quality)
- IP: I and P frames only
- IBP: I, B and P frames
- IBBP: I, BB (two B frames in sequence) and P frames
- IBBBP: I, BBB (three B frames in sequence) and P frames
- IBBBBP: I, BBBBB (four B frames in sequence) and P frames (highest delay; highest quality)
Finally, choose the Group of Pictures (GOP) size for the encoded video from 1 to 1000.
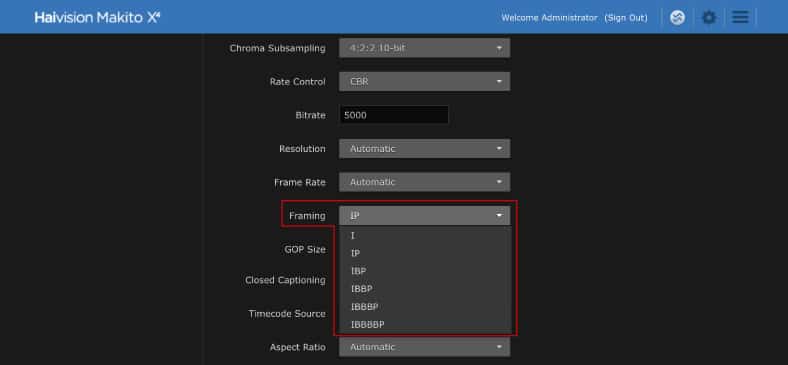 Encoding parameters -framing
STEP 8: APPLY THE ENCODING PARAMETERS
When you’re happy with your encoder parameters, click on Apply on the top right.
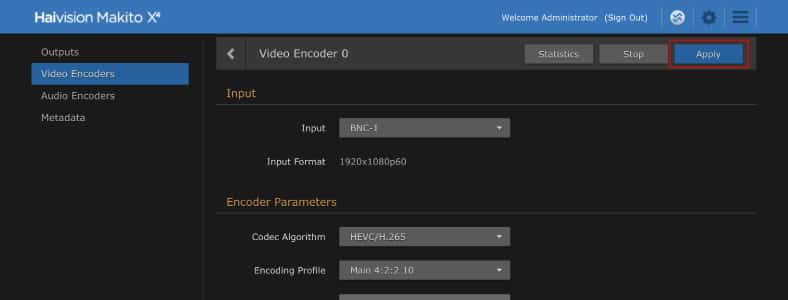 Apply your encoding parameters
Now that you’ve configured your encoder, you’re almost there – just a few final steps to create and configure your output stream.
STEP 9: CREATE AND CONFIGURE A NEW OUTPUT STREAM
To create a new stream click on Outputs on the left-hand menu and then the Add icon.
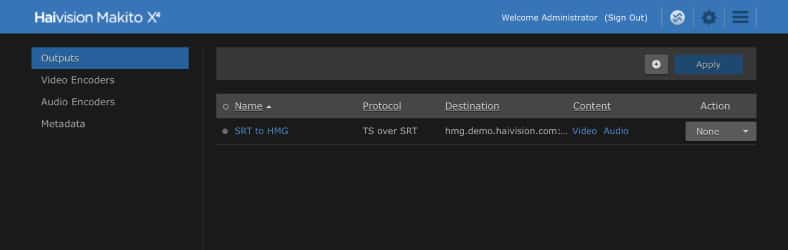 Create a new stream
Give your new stream a name, then select your encoding core and choose your streaming protocol. If you choose SRT for example, you can also choose your mode: caller, listener or rendezvous. Choosing SRT also allows you to select the latency for error correction as well as turn on AES encryption if needed. Finally, add an IP address and port number for the destination.
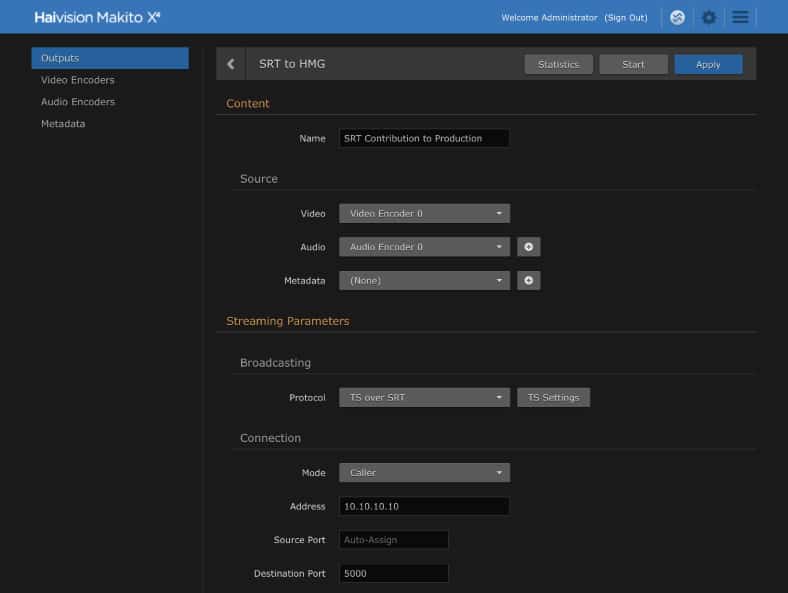
STEP 10 APPLY CHANGES TO OUTPUT STREAM
Last step – apply the changes you made to the output stream.
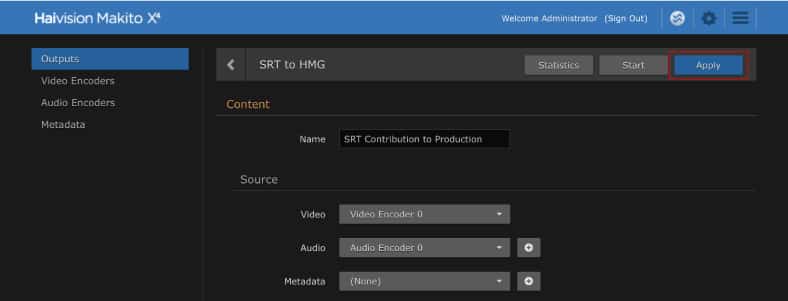 Apply changes to your output stream
Congratulations! You’re now ready to start streaming.
To watch how easy it is to set up a 4K live stream on the Makito X4, watch this video:
